
Rolled meats, sharp cheese, and jewel-toned fruit turn a simple grazing board into a centerpiece people crowd around before the party even starts. A number-shaped charcuterie board has that same generous, casual feel as a classic platter, but the custom shape makes it feel planned, personal, and just a little bit special. It looks abundant without needing complicated cooking, and the mix of salty, sweet, creamy, and crisp keeps every bite interesting.
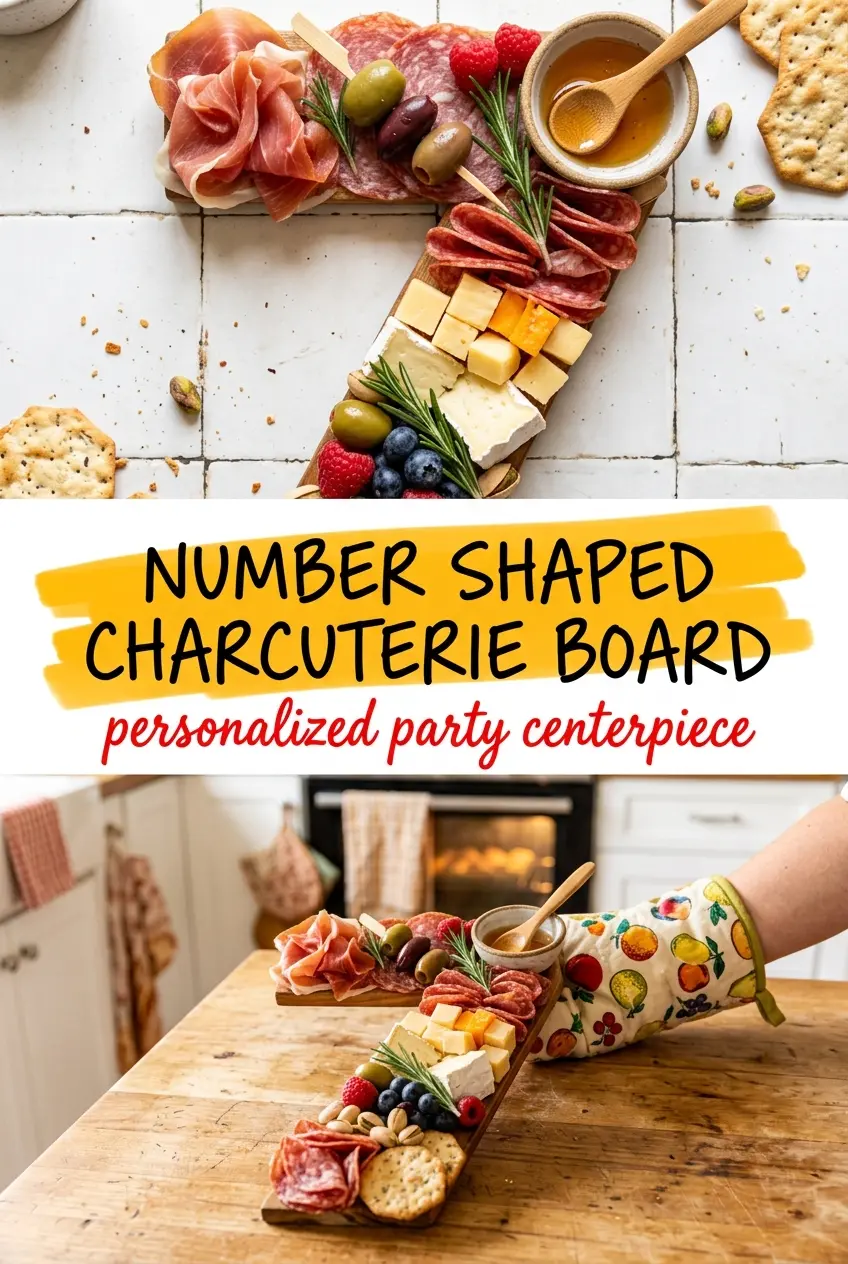
The trick is treating the shape like a framework, not a puzzle. A cardboard number guide gives you clean edges and keeps the design from drifting as you fill it in. I like to build with the largest items first — folded meats and cheese wedges — then tuck berries, crackers, and chocolate into the gaps so the board feels full from every angle. A light drizzle of honey over the cheese pulls the whole thing together and adds just enough shine to make it feel finished.
Below, I’ve included the small details that make this board look polished instead of crowded, plus a few easy swaps if you want to change the look or scale it up for a bigger crowd.
The cardboard number trick made this look so neat, and the honey over the cheese with the berries tucked in between made it taste as good as it looked. Everyone kept picking at it before dinner.
Save this number shaped charcuterie board for birthdays and anniversaries when you want the platter itself to feel like part of the celebration.
The Best Way to Keep a Number Board Looking Intentional
The difference between a polished number-shaped board and one that looks like a pile of snacks is spacing. If every ingredient is the same size, the shape gets muddy fast. You want a mix of folded, stacked, and scattered elements so the eye can read the outline first and the ingredients second. That means using the meats and cheeses to define the number, then filling the smaller gaps with berries and chocolate so the whole thing feels packed without looking random.
Another thing that matters here is the board base. A cardboard cutout gives you a quick, clean guide, and it solves the biggest problem with shaped boards: the edges. Without a template, the ends tend to bulge outward or disappear in places. Once the main shape is filled, tuck crackers around the outside edge instead of burying them in the center. They frame the board and give people an obvious place to start.
What Each Ingredient Is Actually Doing in This Board

- Assorted sliced meats — These give the board its structure and savory backbone. Folding or rolling the slices creates height and helps the number shape read clearly, especially along the outer edges. Salami, prosciutto, and pepperoni all work; just avoid very wet deli meats that slump and blur the lines.
- Assorted cheeses — Cheese blocks the shape in a way nothing else really can. A mix of firm and semi-soft cheeses gives you clean edges plus a little variation in texture. Pre-cut wedges and cubes are fine, but if you want the board to look more custom, cut a few larger pieces yourself so they anchor the design.
- Mixed berries — Berries brighten the board and break up all the rich, salty pieces. They’re also useful for filling small gaps where larger ingredients don’t fit. Rinse and dry them well first; extra moisture is the fastest way to make the board look tired before it’s served.
- Dark chocolate squares — These add a sweet note that makes the board feel a little more celebratory and less strictly savory. They also work well as filler in tight spaces because they hold their shape. If you don’t want chocolate, use dates or dried apricots for the same contrast in a different direction.
- Crackers — Crackers belong around the edge because they give people a landing spot and keep the center from feeling too dense. Thin, sturdy crackers are easiest to arrange without snapping. If you use buttery crackers, place them close to serving time so they stay crisp.
- Honey — A light drizzle over the cheese adds gloss and a sweet finish that ties the whole board together. Use a small amount; too much and the board starts looking sticky instead of polished. Warm honey flows more easily, but it only needs a few seconds in the microwave, not a full melt.
Building the Shape Without Making It Look Crowded
Lay Down the Outline First
Start with the cardboard number as your guide and place the largest ingredients along the border. Fold meats into loose ribbons or small rolls and set them in overlapping rows so they create a clean edge. Build the cheese next, using wedges or cubes to reinforce the corners and straighter sides of the number. If the outline starts to wobble, step back and look at it from above before adding anything else.
Fill the Middle With Contrast
Once the outer shape reads clearly, move inward with the smaller pieces. Nestle berries into open pockets and slide chocolate squares wherever the shape still feels thin. The board should look abundant, but you should still see a little variety in each section instead of one flat mass of the same ingredient. If you run out of room too fast, you’ve placed too many large pieces inside the outline and not enough around the edges.
Finish With the Details That Make It Feel Ready
Add crackers around the perimeter and lean a few pieces slightly outward so the shape feels framed, not boxed in. Drizzle the honey over the cheese right before serving so it catches the light without soaking into the board. The finished platter should look full, balanced, and easy to pull from, with every section offering a different bite. If it looks crowded, remove one or two items from the center rather than trying to squeeze in more around them.
How to Adapt This for Different Guests and Board Sizes
Make it lighter and more produce-forward
Swap part of the meat for extra berries, grapes, sliced cucumber, or figs. You’ll lose some of the salty richness, but the board gets fresher and looks even more colorful. This works especially well if the number is meant for a daytime celebration where people want a lighter grazing option.
Build a gluten-free version
Skip the crackers or use certified gluten-free crackers and check the labels on the meats and chocolate. The board still has plenty of texture without standard crackers, because the cheese, fruit, and meats carry most of the bite. Just keep one dedicated cracker section so guests know exactly what they can grab.
Scale it up for a bigger crowd
Use the same layout logic, just repeat the ingredient clusters instead of stretching them thin. A bigger board needs more repetition of the main ingredients so the number still reads clearly from across the room. If you only increase the board size without increasing volume, the shape starts to look sparse and unfinished.
Storage and Reheating
- Refrigerator: Store leftovers covered for up to 2 days. The crackers will soften, so keep them separate if possible.
- Freezer: This doesn’t freeze well. The fruit and cheese both change texture after thawing, and the board loses the crisp, fresh look that makes it work.
- Reheating: No reheating needed. If the cheese has been chilled, let the board sit at room temperature for 20 to 30 minutes before serving so the flavors open up and the cheese isn’t firm and dull.
Answers to the Questions Worth Asking
Number Shaped Charcuterie Board
Ingredients
Method
- Use a cardboard cutout in a number or letter shape as a guide on the board, so the outline looks crisp and evenly sized. Position it centered where you want the board to be served.
- Arrange meats and cheeses to fill the shape edge to edge, pressing them gently into place for a solid, no-gap look. Keep the cheeses in visible wedges or chunks so they form a golden, savory layer.
- Fill in gaps with berries and chocolate squares, distributing them so you get jewel-toned pops and dark chocolate bites throughout. Place chocolate in small clusters rather than one big section for more even coverage.
- Tuck crackers around the outer edge to frame the number and add crunch. Stand some crackers upright and lay others flat so the border looks varied and abundant.
- Drizzle honey over the cheese before serving in thin lines, focusing on the most cheese-forward areas. Serve immediately so the honey looks glossy and stays fresh.