
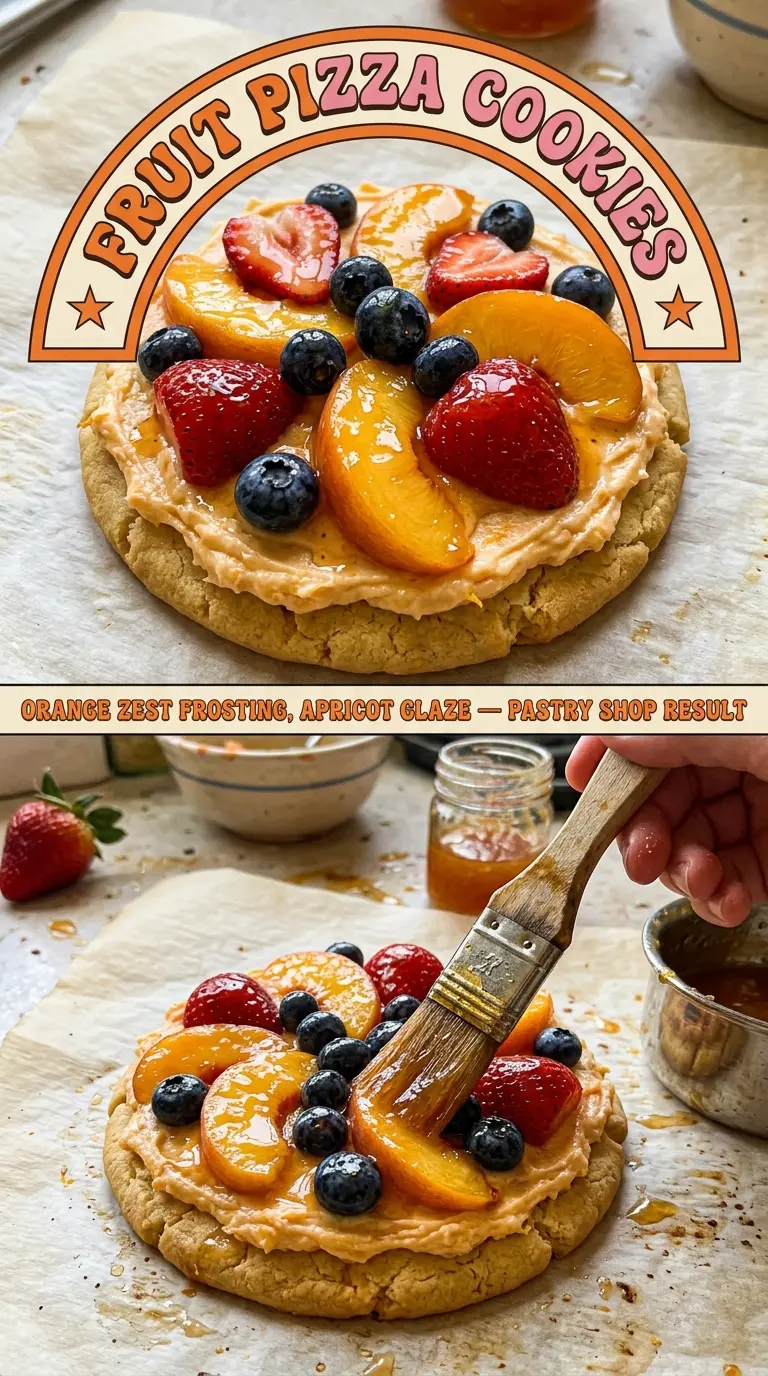
Fruit pizza cookies bring the fun of a classic fruit pizza into a hand-held dessert that looks polished without turning into a project. A soft sugar cookie base holds a thick layer of orange-kissed cream cheese frosting, then the fruit goes on in neat little rows that stay bright and fresh for the first few hours. The last step is what makes them stand out: a thin apricot glaze brushed over the top gives the fruit that glossy, bakery-style finish.
The part that matters most is the balance. The cookie base needs to cool all the way before the frosting goes on, or the cream cheese layer starts sliding. The fruit also needs to be dry, because any extra moisture will thin the glaze and make the cookies look messy fast. Orange zest in the frosting does more than add flavor; it pulls the peaches, berries, and strawberries together so the whole cookie tastes intentional instead of random.
Below, I’ve included the little technique details that keep these looking clean, plus a few variations for different fruit, different dietary needs, and storing them without losing that fresh, glossy finish.
The apricot glaze made these look like little bakery tarts, and the orange zest in the frosting kept them from tasting too sweet. I chilled them for an hour and the fruit stayed put beautifully.
Love the glossy fruit topping on these fruit pizza cookies? Save them to Pinterest for the days when you want a creamy, colorful dessert that looks bakery-made with almost no fuss.
The Reason Fruit Pizza Cookies Stay Neat Instead of Sliding Apart
The biggest mistake with fruit pizza cookies is treating them like a single dessert instead of small assembled pieces. Once the frosting goes on, each cookie becomes its own little surface, which means soft cookie, creamy frosting, and juicy fruit all need to be balanced in a tight space. If the cookie base is warm, the frosting melts. If the fruit is wet, the glaze runs. If both happen, the tops lose that clean, polished look fast.
Bake the cookie rounds until the edges are lightly golden and the centers are just set. They should look finished, but not dry. Then let them cool completely before frosting. That pause matters more than people think, because the cream cheese layer needs a cold surface to stay thick and spreadable instead of turning loose and slippery.
The glaze is the last layer for a reason. Brush it on lightly, not in puddles, or the fruit starts to slide. You want a thin shine, not a syrup bath.
What Each Ingredient Is Actually Doing in This Dish
- Sugar cookie dough — This gives you a sturdy, sweet base that bakes into a soft-but-not-falling-apart cookie. Store-bought dough works well here because the toppings do the heavy lifting, but it needs to be fully baked and fully cooled before assembly.
- Cream cheese — This is the backbone of the topping. Full-fat cream cheese gives the best body and tang, and low-fat versions tend to loosen too much once they sit. If you use a block-style cream cheese, soften it first so it whips smooth without lumps.
- Powdered sugar — It sweetens the frosting without making it gritty. Granulated sugar won’t dissolve the same way and leaves the filling a little sandy.
- Vanilla and orange zest — Vanilla rounds out the cream cheese, while the zest gives the frosting a bright edge that makes the fruit taste fresher. Don’t skip the zest if you want the whole cookie to taste layered instead of just sweet.
- Summer fruit — Use fruit that holds its shape and doesn’t bleed too much. Peaches, blueberries, strawberries, and raspberries give you color and variety, but all of them need to be dry after washing or the glaze won’t set cleanly.
- Apricot jam — This is the secret to the glossy finish. When warmed and brushed thinly over the fruit, it sets into a light shine that looks professional. Apricot works especially well because it’s mild and clear enough not to muddy the colors.
Building the Cookies So the Toppings Stay Sharp
Baking the Cookie Base
Slice the dough into even rounds so every cookie bakes at the same rate. Pull them from the oven when the edges are lightly golden and the centers no longer look raw. If they puff unevenly, press them gently with a spatula while they’re still warm, before they set. Let them cool on the pan first, then move them to a rack so they don’t bend or break.
Whipping the Frosting Smooth
Beat the cream cheese, powdered sugar, vanilla, and orange zest until the mixture looks creamy and spreadable with no visible lumps. If the cream cheese is still cold, you’ll get little bits that won’t smooth out later. The frosting should hold soft peaks and spread like thick cake filling, not pour like glaze.
Arranging the Fruit and Adding Shine
Spread the frosting in a generous layer, then place the fruit on top with a little overlap for a neat finish. Pat the fruit dry before it goes on, especially strawberries and peaches, which release moisture fast. Warm the apricot jam just enough to brush easily, then sweep it over the fruit in a thin coat. If the glaze is hot, it can melt the frosting; if it’s too cool, it drags and tears the fruit arrangement.
How to Adapt These for Different Fruit, Different Diets, and a Crowd
Dairy-Free Version That Still Holds Its Shape
Use a dairy-free cream cheese that’s meant for spreading, not the thin tub-style kind. Whip it with the powdered sugar and zest just until smooth, then chill the topping for 10 minutes before assembling so it firms up a bit. The texture will be slightly softer than the original, but the cookies will still taste clean and bright.
Gluten-Free Cookie Base
Swap in a gluten-free sugar cookie dough that bakes into a firm round, not a cakey one. The toppings don’t change, but gluten-free doughs can brown faster around the edges, so watch the color instead of the clock alone. Let them cool completely, because warm gluten-free cookies can crumble under the frosting.
A Stone-Fruit Version for Maximum Color
Keep the peaches and add sliced nectarines or kiwi if you want a sharper color contrast. Stone fruit gives a softer, juicier bite, so dry the slices carefully and use the glaze sparingly. The result looks especially pretty, but it’s best served the same day because the fruit softens quickly.
Storage and Reheating
- Refrigerator: Store up to 3 hours for the best look and texture. After that, the fruit starts to weep and the cookie base softens.
- Freezer: Don’t freeze assembled fruit pizza cookies. The fruit breaks down and the frosting turns watery when thawed.
- Reheating: These aren’t meant to be reheated. If you need to serve them after chilling, let them sit at room temperature for 10 to 15 minutes so the frosting softens slightly before serving.
Answers to the Questions Worth Asking

Fruit Pizza Cookies
Ingredients
Equipment
Method
- Preheat the oven to 350°F, then slice the sugar cookie dough into 12 rounds and place them on a sheet pan. Bake for 10–12 min until golden, then cool the cookies completely so the frosting won’t melt.
- Beat the cream cheese, powdered sugar, vanilla, and orange zest until smooth. Stop once the frosting is glossy and lump-free for clean coverage.
- Spread the frosting over each cooled cookie. Use a thin, even layer to keep the fruit looking neat and layered.
- Arrange peach slices, blueberries, sliced strawberries, and raspberries decoratively on top of the cookies. Add variety across each cookie so every bite shows multiple colors.
- Warm the apricot jam until easy to brush. Brush the warm apricot jam glaze over all the fruit for a professional glossy finish.
- Serve immediately, or refrigerate the cookies up to 3 hours. Keep them covered so the fruit stays fresh and the jam sheen doesn’t dull.