
Strawberry rhubarb crisp lands on the table with bubbling pink edges, a jammy fruit layer underneath, and a buttery topping that turns deeply golden in the oven. The first spoonful gives you soft fruit, a little tart bite from the rhubarb, and enough crunch on top to keep every bite interesting. It’s the kind of dessert that disappears while it’s still warm, especially when the fruit juices thicken just enough to cling to the spoon instead of running all over the plate.
The balance matters here. Rhubarb needs a sweet partner, and strawberries bring that round, fragrant sweetness without dulling the tang. A little cornstarch keeps the filling from turning soupy, and the topping works best when the butter stays cold so it bakes up crisp instead of sandy. That small bit of restraint is what gives the dessert its clean layers: tender fruit underneath, nubbly crumble on top.
Below, you’ll find the timing that keeps the topping crisp, the one texture cue that tells you the filling is done, and a few smart swaps if you’re working with frozen fruit or need a gluten-free version.
The filling thickened up exactly right and the topping stayed crisp even after sitting on the counter for a bit. I used a little extra strawberry because that’s what I had, and it still had that tart rhubarb bite I was hoping for.
Save this strawberry rhubarb crisp for the dessert that bakes up with a jammy filling and a crisp, buttery topping.
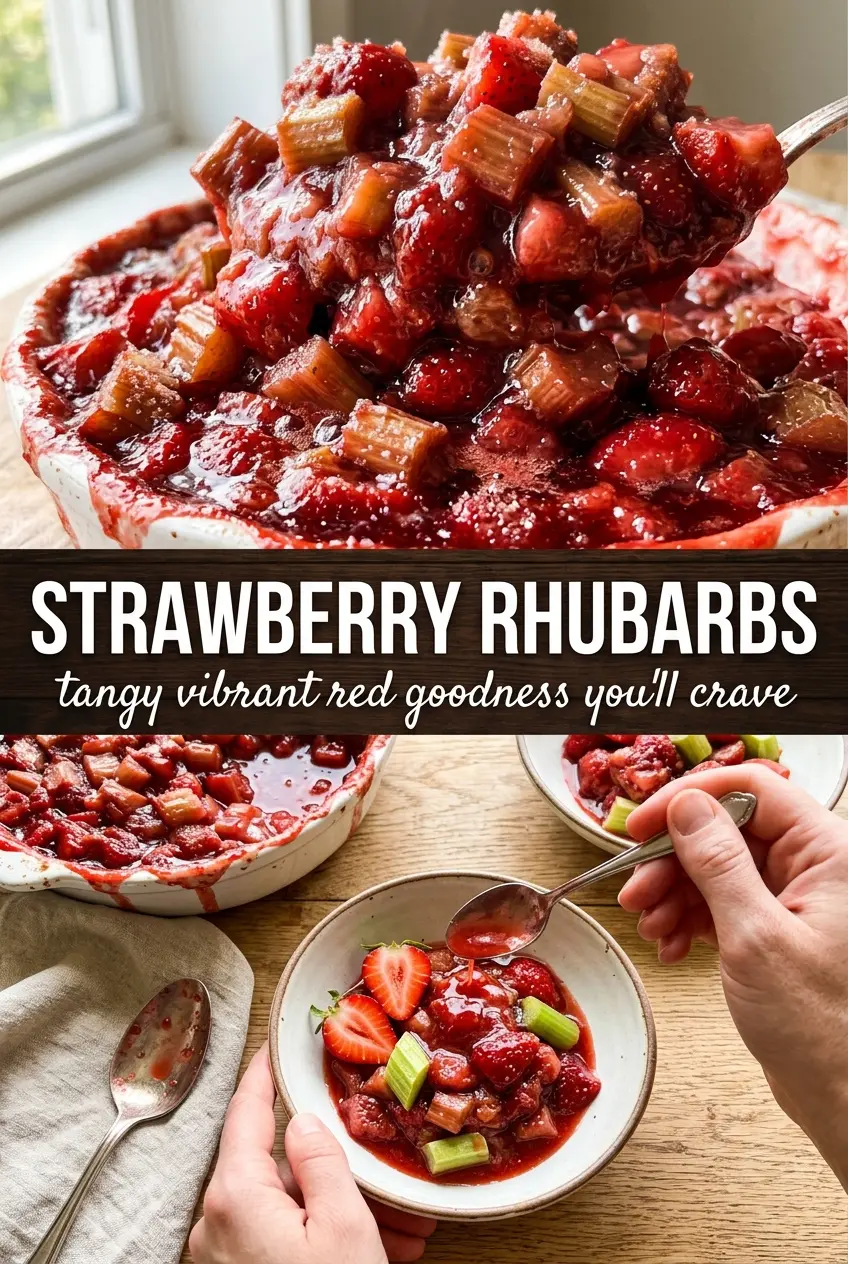
Why the Filling Needs Enough Thickener to Stand Up to the Fruit
Rhubarb and strawberries give off a lot of juice as they bake. If you skip the thickener or use too little, you end up with a watery pan instead of a spoonable filling that holds together on the plate. Cornstarch works well here because it thickens without turning the fruit gluey, but it needs heat and a full bake to do its job.
The other mistake is underbaking. The top may look done before the filling has actually thickened, especially if you’re using a shallow dish. You want active bubbling around the edges and through the center, not just a little steam at the surface. That bubbling tells you the starch has reached the temperature it needs to set.
- Rhubarb — fresh stalks give the best texture, with clean slices that soften but don’t disappear. Trim away all leaves if your bunch still has them; only the stalks belong in the pan.
- Strawberries — ripe berries bring sweetness and fragrance, but they shouldn’t be so soft that they collapse into puree before baking. If they’re large, cut them to match the rhubarb pieces so everything cooks at the same pace.
- Cornstarch — this is what turns the juices into a glossy, scoopable filling. Arrowroot can work if that’s what you keep on hand, but it sets a little looser and can turn slick if it’s overbaked.
- Butter — cold butter in the topping creates those uneven crumbs that bake into crisp pockets instead of a flat, sandy layer. Melted butter changes the texture and makes the topping denser.
Building the Crisp So the Topping Stays Crunchy
Mix the fruit with the sweetener and thickener first
Toss the strawberries and rhubarb until every piece looks lightly coated, then let them sit while you build the topping. That short rest starts drawing out the juices and helps the cornstarch disperse before baking. If you dump the fruit straight into the pan without coating it evenly, you’ll get pockets that thicken and pockets that stay runny.
Cut the butter into the topping until it looks like uneven rubble
Work the cold butter into the flour, oats, sugar, and spice until you’ve got clumps the size of peas and some smaller sandy bits too. That uneven texture is what bakes into crunch. If the butter softens too much, the topping melts into a paste and loses the crisp edge that makes this dessert worth making.
Bake until the juices are visibly bubbling
Put the dish on the center rack and let it go until the top is deeply golden and the filling is bubbling in several spots. That bubbling is the real doneness test. Pull it too early and the fruit will taste sharp and the juices will stay thin. Let it finish and the filling settles into that glossy, spoonable texture that holds up under ice cream.
How to Adapt This for Different Pans, Diets, and Fruit Bins
Gluten-Free Crisp
Swap the flour in the topping for a good 1:1 gluten-free blend and keep the oats certified gluten-free if you need strict avoidance. The topping stays crisp, though it may brown a touch faster, so watch the last 10 minutes closely.
Using Frozen Rhubarb or Strawberries
Frozen fruit works, but don’t thaw it first or you’ll pour off too much juice and lose control of the filling. Toss it with the thickener while still frozen, then add 5–10 extra minutes in the oven if the center is still cool and loose.
Less Sweet, More Tart
Cut the sugar a little if you like rhubarb with more edge, but don’t slash it too hard. Sugar isn’t only for sweetness here; it also helps the fruit juices release and balance the tartness so the filling tastes round instead of sharp.
Storage and Reheating
- Refrigerator: Store covered for up to 4 days. The topping softens a bit as it sits, but the flavor stays excellent.
- Freezer: Freeze baked crisp after cooling completely, wrapped tightly. The topping won’t stay as crunchy after thawing, but it still works well for leftovers.
- Reheating: Warm in a 325°F oven until the filling is hot and the topping firms back up. The microwave will heat the fruit, but it turns the crisp soft fast.
Answers to the Questions Worth Asking
Strawberry Rhubarbs
Ingredients
Equipment
Method
- Preheat the oven to 375°F and line a sheet pan or baking dish so the fruit can bubble without sticking.
- Chop the rhubarb and strawberries into bite-size pieces, then set them aside to assemble the filling.
- Toss the rhubarb, strawberries, granulated sugar, brown sugar, cornstarch, salt, lemon juice, and vanilla extract until evenly coated and glossy.
- Spread the fruit mixture on the lined sheet pan in an even layer so it cooks at the same rate throughout.
- Mix the flour, rolled oats, brown sugar, ground cinnamon, and salt until the dry ingredients look evenly combined.
- Cut in the cold unsalted butter until the mixture forms coarse crumbs with some pea-size bits.
- Sprinkle the topping evenly over the fruit so the surface is covered and will brown in spots.
- Bake at 375°F for 25-35 minutes, until the topping is golden and the fruit juices are bubbling around the edges.
- Rest for 10-15 minutes after baking so the filling thickens slightly before serving.