
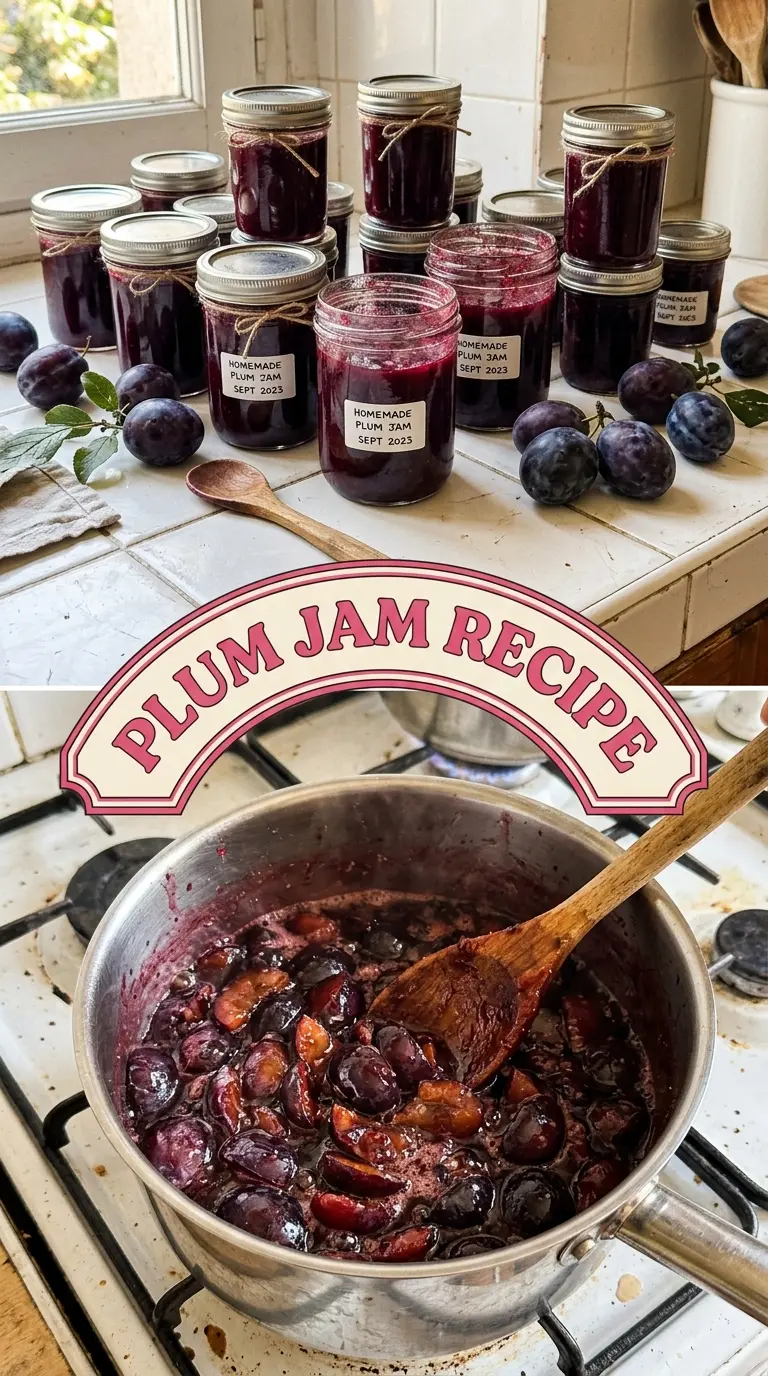
Glossy plum jam with a deep jewel-toned finish earns its place on the shelf fast. The fruit cooks down into something that’s thick and spreadable, but it still keeps enough texture to remind you it started with fresh plums. The sweet-tart flavor is clean rather than cloying, and the cinnamon stays in the background just long enough to round out the fruit without taking over.
What makes this version work is that the plums are left with their skins on and given time to macerate with the sugar and lemon juice before they hit the heat. That step pulls juice from the fruit, starts dissolving the sugar, and helps the jam cook more evenly. The lemon brightens the flavor and helps the set, while the cinnamon gets added at the end so it stays warm and fragrant instead of turning dull in a long boil.
Below, I’ll walk through the point where most homemade jam goes wrong, how to test the set without guessing, and the one plum variety that gives the best balance of sweetness and structure.
The jam set up beautifully on the cold plate test, and I loved that the plum pieces stayed visible instead of turning into a smooth puree. The cinnamon was just enough to warm it up without making it taste like dessert filling.
Save this plum jam recipe for those ripe-plum weekends when you want a bright, spoonable preserve with real fruit texture.
The Mistake That Keeps Plum Jam Too Loose
Most plum jam problems start before the boil. If you dump the fruit, sugar, and lemon juice into the pot and turn on the heat immediately, the plums release liquid unevenly and the sugar hasn’t had time to pull enough juice out of the fruit. The result is a jam that takes longer to thicken and can cook down too far before it ever reaches a proper set.
The 30-minute maceration changes that. You’ll see syrup forming at the bottom of the bowl before the plums ever touch the stove. That syrup matters because it gives the jam a head start and helps the fruit cook in its own juices instead of in a dry, aggressive boil. Keep the boil steady, not violent. A furious boil can scorch the bottom and hide the real thickness until it’s too late.
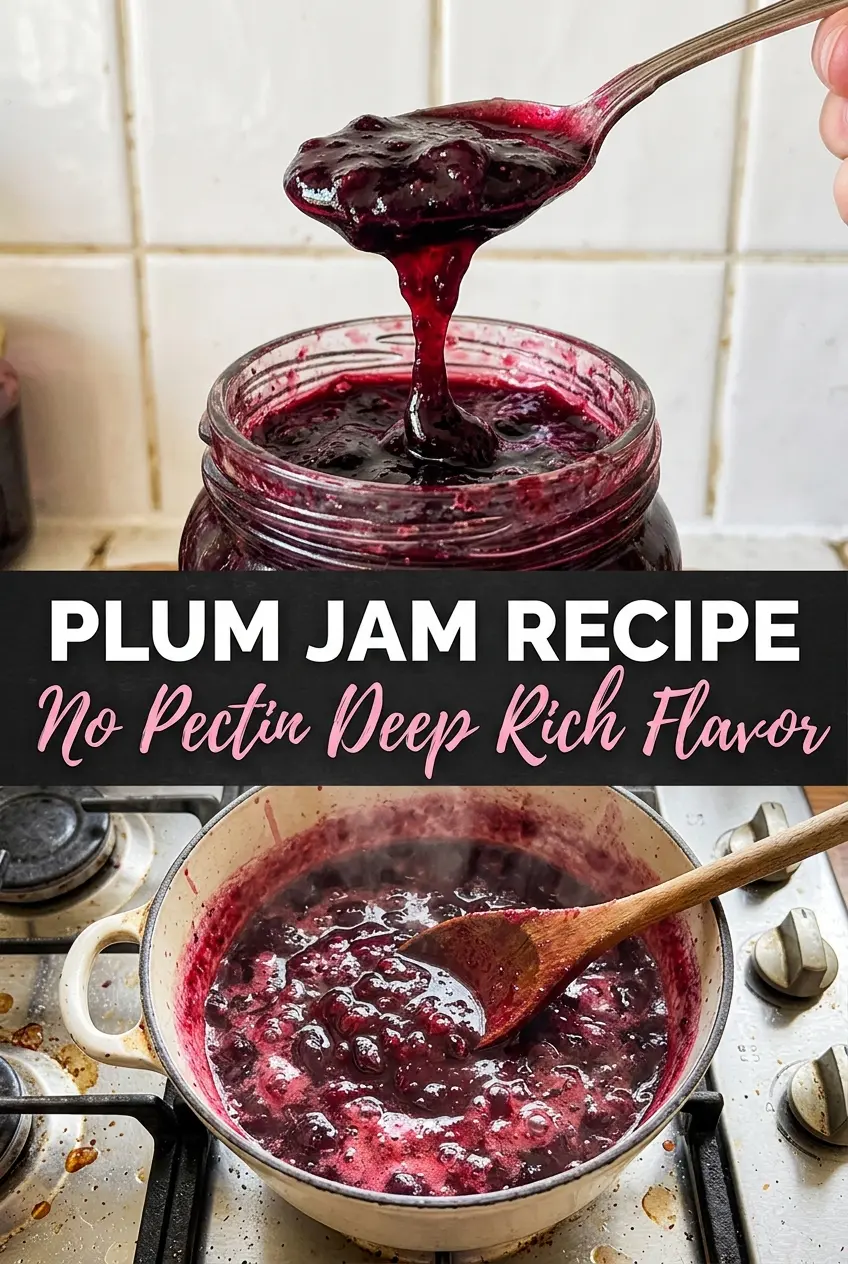
The other common miss is stopping too soon. Plum jam usually looks thinner in the pot than it will look in the jar. The cold-plate test is the honest check here: a spoonful should wrinkle when pushed with a fingertip, not run like syrup.
What Each Ingredient Is Actually Doing in This Plum Jam
- Fresh plums — Leave the skins on. They bring color, body, and a good bit of the natural pectin that helps the jam set. Italian prune plums are ideal because they’re dense, flavorful, and less watery than many round dessert plums.
- Granulated sugar — This does more than sweeten. It draws liquid from the fruit, helps the mixture thicken, and gives the finished jam that glossy look. Cutting the sugar too far can leave you with soft fruit sauce instead of jam.
- Lemon juice — The acid sharpens the flavor and helps the jam gel. Fresh lemon juice is best here, though bottled works in a pinch. If your plums are unusually sweet, the lemon keeps the jam from tasting flat.
- Cinnamon — Add it at the end so it stays warm and fragrant. If it goes in early, it loses some of its edge during the long simmer. The amount here is enough to support the fruit, not turn the jar into pie filling.
How to Cook Plum Jam Until It Sheets Off the Spoon
Macerating the Fruit
Combine the chopped plums, sugar, and lemon juice in a heavy pot or bowl and let them sit for 30 minutes. By the end, you should see a glossy syrup building around the fruit. That syrup is the start of the jam, not waste liquid. If you rush straight to the burner, you lose the chance for the sugar to draw out the plum juices evenly.
Building the Boil
Bring the mixture to a boil over medium heat, stirring often so the sugar dissolves before the fruit sticks. Once it’s boiling, lower the heat just enough to keep a steady simmer. You want small, active bubbles and frequent bubbling around the edges, not a rolling eruption that splatters the stove. Stir from the bottom so nothing catches and darkens before the jam is ready.
Watching for the Set
Cook for 25 to 35 minutes, stirring frequently, until the mixture thickens and the bubbles start to look slower and heavier. The color deepens and the fruit pieces look suspended in syrup instead of floating in juice. Test a spoonful on a cold plate and drag your finger through it. If the line holds and the jam wrinkles, it’s ready. If it runs back together immediately, give it a few more minutes and test again.
Finishing and Jarring
Stir in the cinnamon right at the end, then ladle the jam into sterilized jars while it’s still hot. Work carefully here; thick jam can bubble up around the ladle and burn fast. If you’re canning, leave the proper headspace and process according to your canner’s instructions. If you’re refrigerating it, let the jars cool before sealing and storing.
Three Practical Ways to Adjust This Plum Jam
Make it dairy-free, gluten-free, and vegan without changes
This recipe already fits those needs as written. The only thing that matters is checking any added spice or packaged ingredient for cross-contamination if you’re cooking for someone with a serious allergy. The jam’s set and texture don’t depend on dairy, flour, or eggs.
Swap the cinnamon for a cleaner fruit flavor
Leave the cinnamon out entirely if you want the plums and lemon to taste brighter and more direct. You can also replace it with a small strip of lemon zest cooked in and removed at the end, which gives a more citrus-forward finish. The jam will taste a little sharper and less warm.
Use less sugar with very sweet plums
You can reduce the sugar slightly if your plums are exceptionally ripe, but don’t cut it aggressively. Sugar supports the set and preserves the fruit flavor, so too much reduction leaves the jam looser and less shelf-stable. For a lower-sugar batch, plan to refrigerate it and use it sooner.
Turn it into a chunkier fruit spread
Mash only part of the fruit once it softens and leave some pieces intact. You’ll get a thicker, more rustic spread with visible plum chunks and a little less shine. It’s a good move if you want something closer to preserve than smooth jam.
Storage and Reheating
- Refrigerator: Store in sealed jars for up to 3 weeks. The jam may thicken a touch more as it cools.
- Freezer: Plum jam freezes well in freezer-safe containers with headspace left at the top. Thaw overnight in the fridge.
- Reheating: Jam doesn’t need true reheating for serving, but if it firms up too much, warm a spoonful gently in a small pan or microwave it in short bursts. The common mistake is overheating it until the sugars loosen too far and the texture turns runny.
Answers to the Questions Worth Asking
Plum Jam Recipe
Ingredients
Equipment
Method
- In a Dutch oven, combine the chopped plums, granulated sugar, and lemon juice, stirring until the sugar looks evenly moistened. Let it macerate for 30 minutes, so the fruit releases juices and becomes syrupy.
- Bring the mixture to a boil over medium-high heat, stirring frequently to prevent sticking. Keep stirring as it reaches a steady boil.
- Reduce to a simmer and cook for 25-35 minutes, stirring frequently, until the jam thickens and the fruit looks suspended in glossy syrup.
- Stir in the cinnamon and cook for 1 more minute, just until the aroma blooms. The surface should look shiny and cohesive.
- Test the set by dropping a spoonful onto a cold plate; after 30 seconds it should wrinkle when pushed. If it’s still loose, simmer 3-5 minutes more and re-test.
- Ladle the hot plum jam into sterilized jars and fill to the top. Let cool, then cover and store until ready to use.