
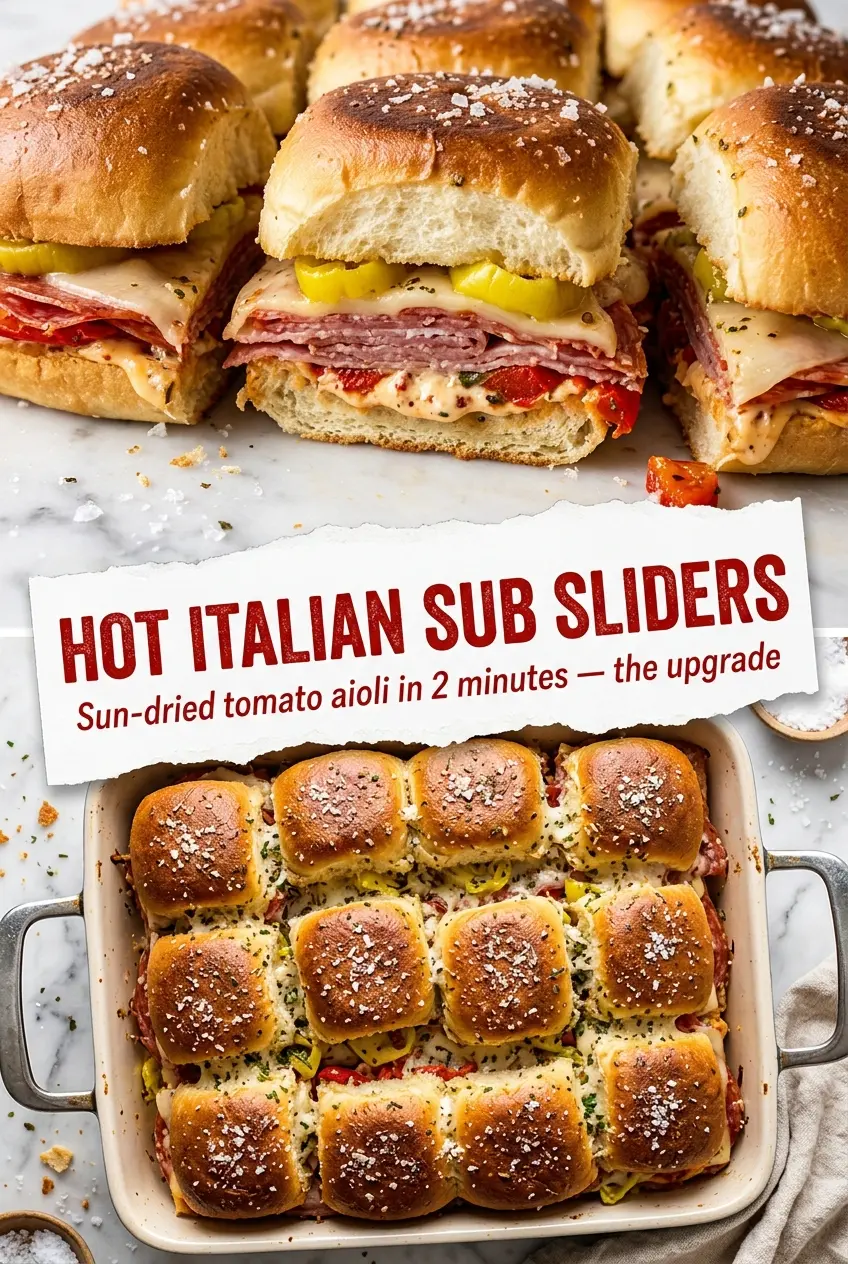
Hot Italian sub sliders hit that sweet spot between party food and weeknight dinner: crisp-edged tops, melty provolone, and a salty, spicy stack that tastes bigger than the pan it bakes in. The rolls soak up just enough butter and seasoning to get golden without turning soggy, and the whole tray comes out with the kind of pull-apart texture people immediately crowd around.
The part that makes these stand out is the sun-dried tomato aioli. Mixing mayo with sun-dried tomatoes gives you a spread that’s richer and more savory than plain mayonnaise, with a little sweetness that plays nicely against the pepperoncini and cured meats. It takes minutes to blend, but it changes the whole sandwich from standard deli slider to something that tastes like it was planned by someone who knows exactly how to build flavor.
Below, I’ve included the small details that matter: how to keep the bottoms from getting soggy, why the foil cover matters for the first part of baking, and a few easy swaps if you want to adjust the meat or make them a little milder.
The sun-dried tomato aioli was the thing that got people talking, but what impressed me most was how the bottoms stayed soft without getting mushy. I baked them covered first like you said, then uncovered them at the end and the tops came out golden with that salty finish.
These hot Italian sub sliders are the kind of tray-bake worth pinning for game day, parties, or any night you want melty, salty sandwiches with a sun-dried tomato aioli that steals the show.
The Secret to Keeping Slider Bottoms Soft, Not Soggy
The most common mistake with baked sliders is rushing straight to uncovered heat. That sounds like the path to crispness, but it usually just dries out the top buns before the cheese fully melts. The covered bake gives the provolone time to soften and the meat time to heat through, while the bread underneath absorbs just enough moisture to stay tender.
The other thing that matters here is how you layer. The aioli goes on the bottom buns, but the wetter ingredients need to sit above the meat and cheese, not directly against the bread in a heavy puddle. Pepperoncini and roasted red peppers bring brightness, but if you pile them on without draining them first, the sandwiches can slide apart when you cut them.
- Hawaiian rolls — Their slight sweetness plays well with the salty meats and tangy peppers, and the soft, connected structure makes them ideal for pulling apart cleanly. Any soft slider roll works, but dinner rolls that are too crusty won’t give you the same tender bite.
- Hot capicola, genoa salami, and sliced turkey — This mix gives you spice, richness, and a little lighter meatiness instead of one-note deli flavor. You can swap in all ham or all turkey, but you’ll lose the layered bite that makes these taste like a real Italian sub.
- Sharp provolone — Sharp provolone melts smoothly and brings enough punch to stand up to the meats. Mozzarella will melt, but it’s too mild here; if you use it, the sliders taste flatter.
- Sun-dried tomatoes in the aioli — These do the heavy lifting in the spread, adding concentrated savory-sweet depth that mayo alone can’t give you. If your sun-dried tomatoes are packed in oil, drain them lightly before blending so the aioli doesn’t turn greasy.
- Pepperoncini and roasted red peppers — The pepperoncini bring acid and heat, while the roasted red peppers round everything out with sweetness. Pat both dry before layering so the buns stay intact.
Building the Tray So the Cheese Melts Before the Bread Overcooks
Preheat the oven first. These bake fast enough that you want the heat ready the moment the tray is assembled. Slice the rolls cleanly across the middle, keeping the top and bottom halves as even as possible so the sliders bake in one level layer instead of tipping and sliding apart.
Spread the Aioli First
Blend the mayo and sun-dried tomatoes until the mixture looks smooth and speckled, not chunky. Spread it over the bottom buns edge to edge. That even layer keeps the bread from tasting dry and gives every bite the same rich, savory base.
Stack the Meat and Cheese in Order
Lay the capicola, salami, and turkey in loose layers so they warm through evenly. Add the provolone next, then the peppers. The cheese needs to sit between the meat and the vegetables so it melts into the stack instead of letting the fillings slide around when you slice the tray.
Butter, Cover, and Finish Hot
Brush the tops with melted butter mixed with Italian seasoning and garlic powder, then add the flaky sea salt. Cover the pan for the first part of baking so the steam melts the cheese and softens the rolls. Uncover it for the last few minutes to get a little color on top. If you leave it uncovered the entire time, the tops can dry out before the center is hot.
Make It Spicier
Add sliced cherry peppers or a thin layer of Calabrian chili paste under the aioli. That pushes the sliders into hotter territory without changing the structure of the sandwich, and the extra heat works well with the sweet rolls.
Milder, Kid-Friendly Version
Swap the capicola for more turkey or ham and use mild provolone or mozzarella. You’ll lose some of the peppery edge, but the sliders stay gooey and satisfying, with the aioli still giving them enough personality to taste like a finished dish.
Gluten-Free Version
Use gluten-free slider rolls and watch the baking time closely, since those breads often brown faster and dry out sooner. Keep the tray covered for most of the bake so the center heats before the top gets too firm.
Storage and Reheating
- Refrigerator: Store leftovers for up to 3 days. The rolls soften a bit as they sit, but the flavor holds well.
- Freezer: These freeze best before baking. Assemble the sliders without the butter topping, wrap tightly, and freeze for up to 1 month. Bake from thawed for the best texture.
- Reheating: Reheat covered in a 325°F oven until warmed through. The biggest mistake is microwaving them straight from the fridge, which makes the bread rubbery and the cheese uneven.
Answers to the Questions Worth Asking
Hot Italian Sub Sliders
Ingredients
Equipment
Method
- Preheat the oven to 350°F and slice the Hawaiian rolls horizontally, keeping them attached on one side if possible. Set a sheet pan nearby for building the sliders.
- Spread sun-dried tomato aioli on the bottom halves of the rolls in an even layer. This creates a tangy, savory base for the fillings.
- Layer hot capicola, genoa salami, sliced turkey, sharp provolone, pepperoncini peppers, and roasted red peppers over the aioli. Distribute the fillings so each slider portion gets a bit of everything.
- Replace the tops of the rolls and brush the butter-seasoning mixture over the top buns. Sprinkle flaky sea salt on top for a crisp, restaurant-style finish.
- Cover the sliders and bake at 350°F for 15 minutes, until the cheese starts melting. Look for warmed layers through the centers.
- Uncover and bake at 350°F for 5 more minutes to lightly toast the tops. The rolls should look golden and the cheese should be visibly melted.
- Slice into slider portions and serve hot. Spoon up any melted cheese and juices from the pan over the sandwiches.