
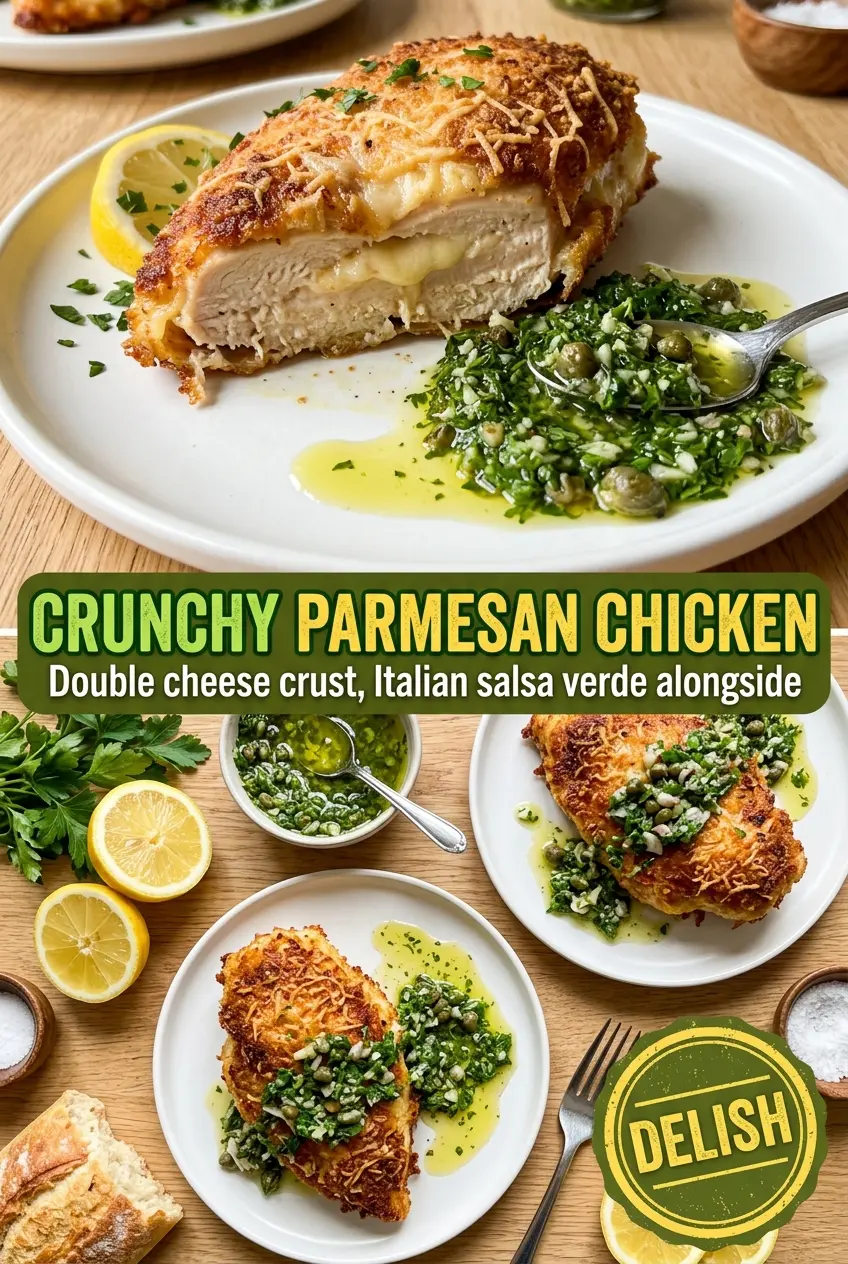
Crunchy Parmesan chicken earns its place in the rotation because the crust stays shattery and savory while the chicken inside stays juicy. The panko brings the crunch, but the real trick is the mix of Parmesan and pecorino Romano, which fries into a deeper, saltier crust than Parmesan alone. That extra edge makes the coating taste finished instead of one-note.
The other thing that sets this version apart is the salsa verde spooned alongside the chicken. Bright parsley, capers, garlic, and lemon cut through the richness and keep every bite tasting fresh. You get a crisp cutlet, a punchy green sauce, and a dish that feels restaurant-level without asking for much more than a few smart ingredients and a hot pan.
The crust came out crisp all the way across, and the salsa verde was the best part — it kept the chicken from feeling heavy. I loved that the pecorino made it taste sharper than the usual Parmesan version.
Love that crisp Parmesan crust and bright salsa verde? Save this chicken for the nights when you want something fast, golden, and a little more special than plain cutlets.
The Secret to a Crust That Stays Crunchy After Baking
Most breaded chicken goes soft because the coating is either too fine, too wet, or never gets a real chance to set before it hits the oven. Panko solves part of that problem, but the cheese matters too. Parmesan alone can taste good, but pecorino Romano adds a drier, sharper edge that helps the crust fry up with more character and less heaviness.
The other mistake is rushing the sear. You want a deep golden crust in the pan before the chicken goes into the oven, because that first layer of browning is what protects the breading from turning soggy. If the cutlets are crowded, they steam instead of crisp. Give them space and let the pan do the work.
- Pound the chicken thin — A 1/2-inch cutlet cooks fast and evenly, which keeps the crust from burning before the center is done.
- Press the crumbs on firmly — The coating needs to cling before it fries. A loose crust flakes off in the skillet.
- Use both cheeses — Parmesan brings nutty saltiness, while pecorino sharpens the flavor and dries the coating just enough to help it crisp.
- Rest after baking — A short rest keeps the juices in the meat instead of running out the second you slice into it.
What the Parmesan, Pecorino, and Panko Each Bring to the Pan

The breadcrumb mix is where this chicken gets its texture. Panko gives you the open, jagged crunch that regular fine breadcrumbs can’t match, and the grated cheeses melt into that crumb layer instead of disappearing into it. If you only use one cheese, the crust will still work, but it won’t have the same savory depth.
Freshly grated Parmesan matters more than the bagged stuff here because it melts and browns more cleanly. Pecorino Romano is saltier and sharper, so it can take the crust from pleasant to memorable. If you need to swap it out, use more Parmesan and add a pinch more salt, but know the finished coating will be a little less bold.
- Chicken breasts — Pounding them thin keeps them tender and helps them cook in the same window as the crust browns.
- Panko breadcrumbs — These are worth using. They’re lighter and crunchier than standard breadcrumbs.
- Parmesan and pecorino Romano — Freshly grated is the move. Pre-grated cheese tends to clump and brown less evenly.
- Parsley, capers, garlic, lemon — The salsa verde needs fresh parsley and lemon for brightness. Capers bring the briny pop that keeps the sauce from tasting flat.
Building the Coating, Searing the Chicken, Finishing in the Oven
Set Up the Breading Line
Season the pounded chicken first, then move it through flour, beaten eggs, and the panko-cheese mixture. The flour gives the egg something to grab onto, and the egg gives the crumbs a tacky surface so they stay put. Press the crumbs on with the flat of your hand. If the coating looks patchy before it hits the pan, it will look patchy after frying.
Fry Until the Crust Turns Deep Gold
Use enough olive oil to coat the pan and let it heat before the chicken goes in. The cutlets should sizzle the second they touch the skillet; if they don’t, the breading absorbs oil instead of sealing. Cook until the underside is a deep golden brown and releases easily, then flip once. If you have to scrape at it, give it another minute.
Finish in the Oven Without Drying It Out
After both sides are seared, move the chicken to a 400°F oven for a short bake. This finishes the center without forcing you to overcook the crust in the pan. Pull it when the chicken feels firm and the juices run clear, not when the coating looks dark enough to alarm you. The carryover heat will finish the job during the rest.
Blend the Salsa Verde Last
The sauce takes less than a minute and should taste bright, salty, and a little sharp. Blend the parsley, capers, garlic, olive oil, and lemon juice until it’s spoonable. If it seems too thick, add a teaspoon of water or a squeeze more lemon. The goal is a loose sauce, not a paste.
How to Adapt This for Different Diets and Different Nights
Gluten-Free Crunch Without the Grain
Swap the flour for a light dusting of cornstarch or a gluten-free flour blend, and use certified gluten-free panko. The crust still comes out crisp because the real texture comes from the panko and the pan-sear, not the regular flour.
Dairy-Free Version With Less Richness, More Crunch
Leave out the Parmesan and pecorino and season the panko a little more aggressively with garlic powder, Italian seasoning, and salt. You lose the nutty cheese crust, but you keep a clean, crisp breaded chicken that still works well with the salsa verde.
Use Chicken Cutlets Instead of Whole Breasts
If your chicken breasts are very large, slice them horizontally into cutlets instead of pounding them flat. You’ll get more even pieces with less effort, and the crust-to-chicken ratio gets even better.
Storage and Reheating
- Refrigerator: Store the chicken for up to 3 days. The crust softens a little, but it still reheats well.
- Freezer: Freeze the cooked chicken without the salsa verde. Wrap tightly and freeze for up to 2 months, then thaw in the fridge before reheating.
- Reheating: Reheat on a rack in a 375°F oven or air fryer until hot and crisp again. The usual mistake is microwaving, which turns the coating limp before the center is warmed through.
Answers to the Questions Worth Asking
Crunchy Parmesan Chicken
Ingredients
Equipment
Method
- Pound the boneless skinless chicken breasts to about 1/2-inch thickness, then season with salt, pepper, garlic powder, and Italian seasoning.
- Rest the seasoned chicken while you set up the coating stations.
- Mix panko breadcrumbs with freshly grated Parmesan and finely grated pecorino Romano until evenly combined.
- Dredge each cutlet in all-purpose flour, then beaten large eggs, then press firmly into the panko-cheese mixture so the coating adheres.
- Heat olive oil in a cast iron skillet over medium-high heat and sear the breaded chicken 3-4 minutes per side until deep golden.
- Transfer to a sheet pan and bake at 400°F for 8-10 minutes until cooked through.
- Blend fresh parsley, capers, garlic, olive oil, and lemon juice until the salsa verde is a sauce consistency.
- Rest the chicken briefly, then serve with generous salsa verde spooned alongside.