
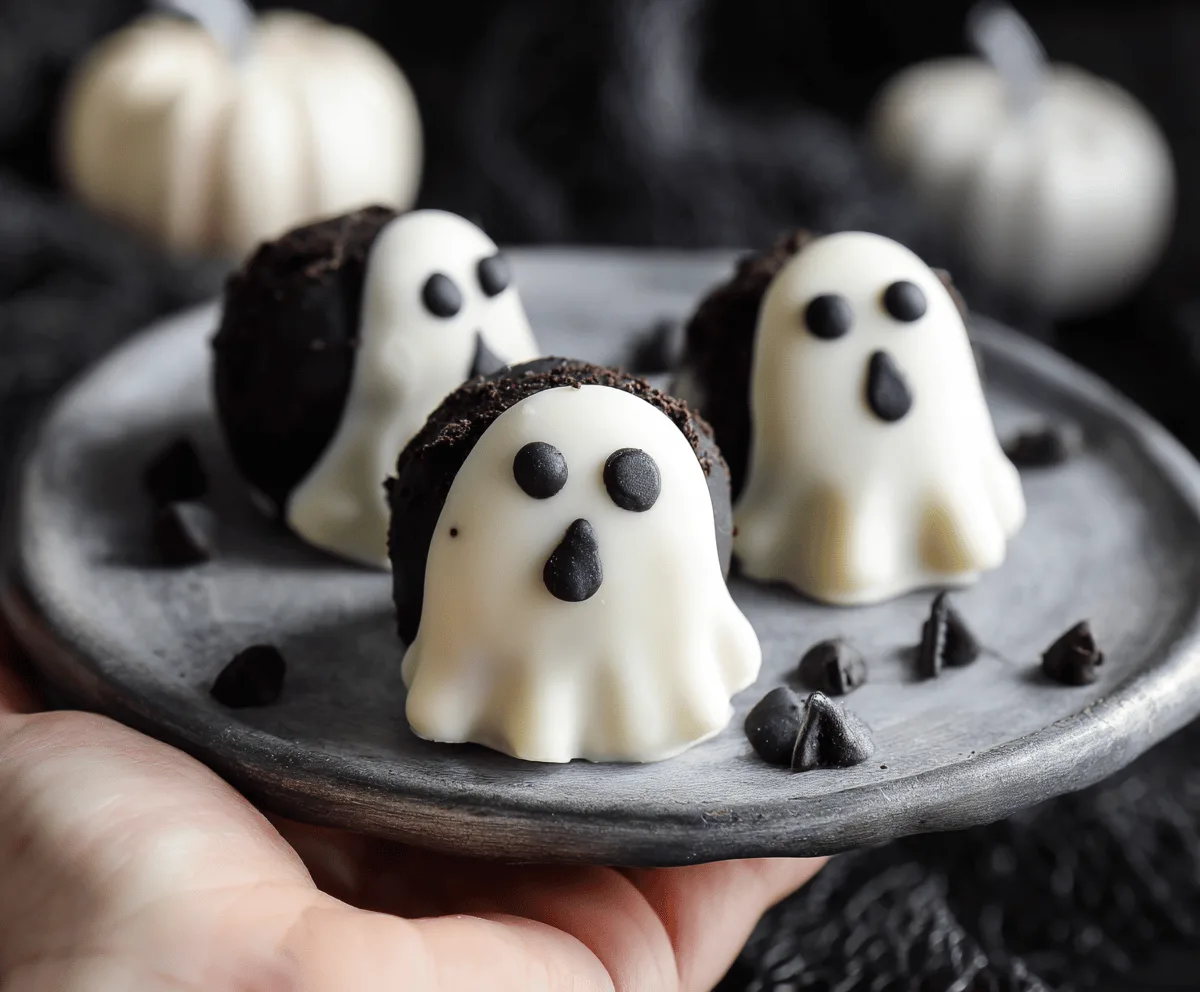
No-Bake Oreo Ghost Truffles are a fun and easy treat that’s perfect for Halloween or anytime you want something sweet and spooky! These little bites combine crushed Oreo cookies with cream cheese to make a smooth, creamy base, all covered in white chocolate that turns them into adorable ghost shapes. The crunchy cookie bits and smooth coating make each bite a perfect mix of textures.
I love making these because they don’t require any baking, which means I can whip them up quickly when I’m craving something festive but don’t want to heat up the kitchen. Plus, decorating the faces on the ghosts with just a few simple dots of dark chocolate is so much fun and never gets old. It’s a great way to get kids involved, too—they can help form the truffles and add their own fun expressions.
My favorite way to serve these is on a cute platter surrounded by other Halloween goodies, making them the star of the party. They’re also perfect for sharing with friends or bringing to a potluck because they travel well and always disappear fast. If you’ve got leftover Oreos in the cupboard, this recipe is a perfect way to use them up and make something that’s both playful and delicious.
Key Ingredients & Substitutions
Oreos: The classic Oreo cookies give the truffles their signature chocolate and cream flavor. You can swap for any chocolate sandwich cookie if you prefer gluten-free or a different brand.
Cream Cheese: This adds creaminess and helps bind the cookie crumbs. Use full-fat for best results, but light cream cheese works too if you want a lighter dessert.
White Chocolate or Candy Melts: White chocolate coats the truffles to create the ghostly look. Candy melts are easier to work with as they melt smoothly and set quickly. If using white chocolate, add a tiny bit of vegetable oil to help with melting.
Candy Eyes and Black Gel: Candy eyes bring the ghosts to life, making decorating easy. If you can’t find candy eyes, simple dots made with melted dark chocolate or black icing work well.
How Do You Get the Perfect “Ghost Sheet” Look with the Chocolate Coating?
Coating the truffles with melted white chocolate to create that flowing ghost shape takes a bit of care. Here’s how I do it:
- Use a fork or dipping tool to dip each chilled Oreo ball into the melted white chocolate fully.
- Let the excess drip off gently, but don’t shake it too much—you want the chocolate to pool a bit at the bottom to form the ruffled “sheet” edge.
- Place the dipped truffle carefully on parchment paper and avoid moving it until the chocolate sets a little.
- Add the eyes and mouth decorations quickly before the chocolate hardens, so they stick well.
- Let the truffles set completely at room temperature or pop them in the fridge for faster firming.
Patience is key here. The pooling chocolate creates that cool ghost effect that makes these truffles so fun and festive.
Equipment You’ll Need
- Food processor or ziplock bag and rolling pin – I use this to crush the Oreos evenly and quickly.
- Mixing bowls – perfect for combining the crushed cookies and cream cheese.
- Parchment paper – keeps your truffles from sticking and makes cleanup easier.
- Microwave-safe bowl – for melting the white chocolate or candy melts smoothly.
- Fork or dipping tool – helps coat the truffles evenly without mess.
- Small icing piping or black decorating gel – for creating the ghost faces easily.
- Refrigerator – to chill and set the truffles before coating and decorating.
Flavor Variations & Add-Ins
- Use dark chocolate or peanut butter cups instead of Oreos for different flavors but keep the cream cheese for binding.
- Mix in some finely chopped candies or sprinkles inside the mixture for a fun surprise inside the truffles.
- Color the white chocolate with food coloring before coating to create different spooky characters or themes.
- Decorate with additional candies, sprinkles, or colored icing for more festive looks beyond the ghost faces.
No-Bake Oreo Ghost Truffles
Ingredients You’ll Need:
- 36 Oreo cookies (about 1 package)
- 8 oz (225 g) cream cheese, softened
- 12 oz (340 g) white chocolate or white candy melts
- Candy eyes (or small white and black icing dots for eyes)
- Black decorating gel or melted dark chocolate for mouth
- Crushed Oreo crumbs (optional, for garnish)
How Much Time Will You Need?
This recipe takes about 15 minutes for mixing and rolling, 30 minutes to chill the Oreo balls, plus 10-15 minutes for dipping and decorating. In total, expect around 60 minutes before your spooky ghost truffles are ready to enjoy!
Step-by-Step Instructions:
1. Crush the Oreos:
Put the Oreo cookies into a food processor and pulse until they become fine crumbs. If you don’t have one, place the cookies in a large ziplock bag and crush them using a rolling pin until finely ground.
2. Mix with Cream Cheese:
Transfer the crushed Oreos to a mixing bowl. Add the softened cream cheese and mix thoroughly using a spoon or your hands until the mixture looks like cookie dough.
3. Roll into Balls:
Scoop out portions of the mixture and roll each into a ball about 1 inch wide. Place these balls on a baking sheet lined with parchment paper.
4. Chill the Oreo Balls:
Put the baking sheet in the refrigerator for about 30 minutes. This helps the balls firm up and makes dipping easier.
5. Melt the White Chocolate:
While the Oreo balls chill, melt the white chocolate or candy melts in a microwave-safe bowl. Heat in 30-second bursts, stirring in between until the chocolate is smooth and fully melted.
6. Dip the Oreo Balls:
Take the chilled Oreo balls out of the fridge. Using a fork or dipping tool, dip each ball into the melted white chocolate, letting the extra drip off. Place them back on the parchment paper. Let the excess chocolate pool lightly at the bottom to create a ghostly, ruffled edge.
7. Add Eyes and Mouth:
Before the chocolate coating hardens, quickly put two candy eyes on each ghost. Use black decorating gel or melted dark chocolate to draw a small round mouth just below the eyes, giving your ghosts their spooky faces.
8. Let Set:
Allow the chocolate to harden by leaving the truffles at room temperature or placing them in the refrigerator.
9. Optional Garnish:
Sprinkle crushed Oreo crumbs around the truffles on your serving plate to look like spooky dirt or ground.
10. Serve and Enjoy!
Your adorable and delicious No-Bake Oreo Ghost Truffles are ready to be enjoyed. Keep leftovers in an airtight container in the fridge for up to a week.
Can I Use Regular Chocolate Instead of White Chocolate?
Yes, you can! If you prefer, melt regular milk or dark chocolate for dipping. Just keep in mind it won’t have the classic ghostly white look, but they’ll still taste amazing.
How Should I Store the Oreo Ghost Truffles?
Store them in an airtight container in the refrigerator for up to one week. Let them sit at room temperature for a few minutes before serving for the best flavor and texture.
Can I Make These Truffles Ahead of Time?
Absolutely! You can prepare and decorate the truffles a day or two ahead. Keep them refrigerated until serving to maintain freshness and help the chocolate stay firm.
What Can I Use If I Don’t Have Candy Eyes?
No worries! You can make eyes by piping small white dots with icing and topping with a tiny dab of melted dark chocolate or black decorating gel for pupils.